
Welcome to the world of Jira administration, where our JIRA instances serve as our digital abode, guiding us through the labyrinth of projects and tasks.
Like any home, these instances require regular tidying and organization to ensure a seamless and efficient experience.
Join us to uncover the three key steps for cleaning up JIRA. Streamline your environment, boost productivity, and craft a joyful digital space for all users.
1. Prepare for the clean up JIRA
Imagine this: after migration, you’ve successfully settled into your new JIRA environment, but beneath the surface, hidden tasks and outdated elements start to accumulate like forgotten dust. The clutter grows, and productivity wanes, leaving you with an overwhelming sense of unease. Fear not! The answer lies in post-migration cleanup—a strategic and essential process that empowers you to harness the full potential of your JIRA instance.
Before embarking on cleaning up your JIRA instance after migration, it’s essential to be well-prepared. Begin with these initial steps:
Backing up your JIRA instance
This step is of paramount importance. It serves as a safety net, safeguarding your valuable data and configurations. In case any unintended errors or missteps occur during the cleanup process, having a backup ensures that you can easily revert to the previous state without losing any critical information. This reassurance allows you to approach the cleanup with confidence, knowing that you have a reliable fallback plan.
Gathering comprehensive information
Understanding your JIRA’s current state is key. By taking inventory of projects, issues, users, custom fields, and instance performance, you gain valuable insights into areas that require attention. This information empowers you to make informed decisions during the cleanup, ensuring that your efforts target the most relevant and impactful elements.
Determining cleanup goals
Defining cleanup goals maintains focus. Whether your aim is to remove old projects, eliminate unused issues, disable inactive users, or optimize project structures, setting clear goals helps prioritize tasks. This step ensures that your efforts align with the specific needs and goals of your JIRA environment.
Communication with your team
Collaboration and communication are vital. Engage your team, including leads and admins, to understand redundancies and issues. Keep all informed and involved for a smoother cleanup, addressing questions and concerns, and fostering a cohesive effort toward an organized JIRA instance.
2. Start clean up JIRA
When cleaning JIRA, break tasks into categories for easier management. This helps with initial intimidation, especially for larger instances.
Atlassian recommends a systematic order for your cleanup:
Projects
Begin by identifying and archiving stale projects. Archiving preserves data while still delivering query results and reindexing improvements.
Issues
Similarly, search for opportunities to archive outdated issues. Archiving ensures data retention while effectively “moving it out of the way.”
Custom Fields
Identify and remove any custom fields that are no longer in use. Additionally, optimize performance by adjusting custom fields with a “global” context to specific projects.
Inactive Users
While removing users who have left your organization is essential, it’s prudent to double-check for any oversight. Utilize last login dates to avoid ticket assignments and free up licenses.
Alongside Atlassian’s recommendations, review other areas for unused elements across projects, including workflows, workflow schemes, screens, screen schemes, issue types, issue type schemes, and permission schemes. Eliminate any completely unused components, and consider consolidating duplicates to simplify project configuration for administrators.
By methodically approaching the cleanup through these categorized steps, you can effectively declutter your JIRA instance, optimize its performance, and ensure a more streamlined and efficient project management experience.
3. Update your JIRA instance regularly
Update your JIRA instance regularly to make sure it is up-to-date and working properly. You can do this by enabling automatic updates or by installing updates manually.
Consider following these rules accordingly:
| Quarterly | Annually |
|
Custom Fields (pay attention to contexts) Identify projects for archive or deletion Remove inactive users Archive old issues Prepare for the annual cleanup Audit third-party apps |
Archive or delete projects Audit third-party apps |
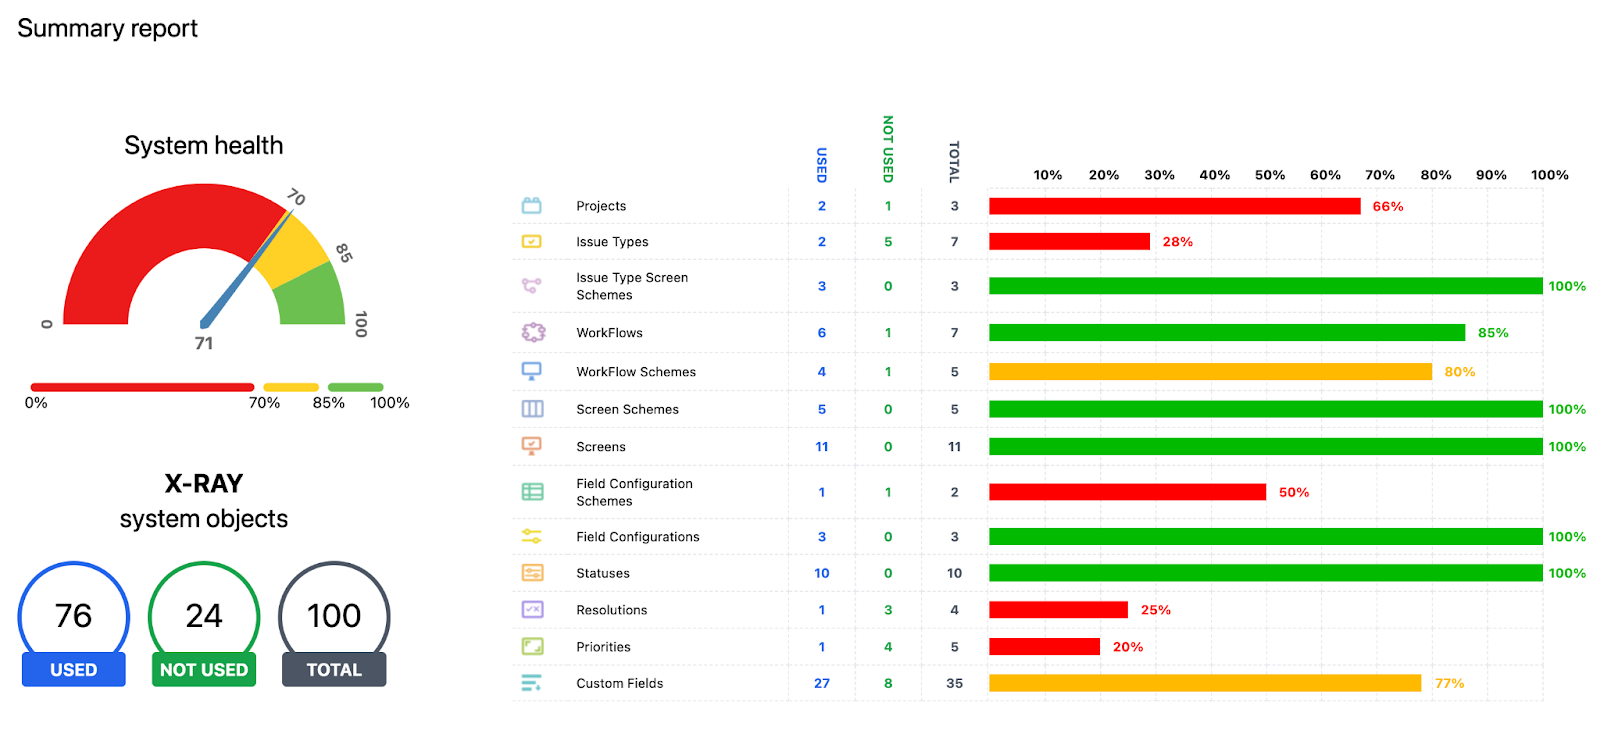
Cleaning JIRA instances after migration is crucial, but can be a daunting task. With Doctor for JIRA, this process becomes easier and more efficient. You’ll quickly check the health of your configuration. With help comes a usability report that shows improvements with percentages, making it easy to understand and take action. Doctor for JIRA performs a comprehensive analysis of all JIRA objects, including custom fields and workflow patterns, offering detailed reports and customized recommendations for each group.
Conclusion:
Post-migration cleanup is a strategic and essential process to unlock the full potential of your JIRA instance. By being well-prepared and following the three crucial steps, you can declutter your JIRA environment. Remember to regularly update your JIRA instance to ensure it stays up-to-date and functions properly.
Cleaning up JIRA can be tough, but Doctor for JIRA makes it easier. Get a usability report and thorough analysis to spot improvements and maintain a clean, efficient JIRA.